Thursday, November 29, 2012

Trying my hand at Cake Pops

CakePops - Plain & Decorated

Well this past Saturday I decided to break out the little BabyCakes CakePop Maker I bought a couple weeks ago.  I tell you I love this little thing.  Of course you have to do your research on what recipes are successful and which ones aren't, but I did find through reading a formula that works out quite nicely.


If you are using regular cake mix and not making from scratch the formula is as follows:

2 C of cake mix (any brand)
4 Tbsp of melted butter
1/2 C of water or milk (depending on box instructions on which liquid to choose)
1 egg

Please be aware that the "batter" will be quite thick, when you see it you might think it can't be right, but trust me it is.  It is very hard to stir so if you are using your hands you will feel quite a bit resistance.  If you have a hand mixer it works well at low speed because as I said before it is very thick.  I actually added a couple more tablespoons of water to help "loosen" up the batter a bit so I could get the remaining "powder" to blend.

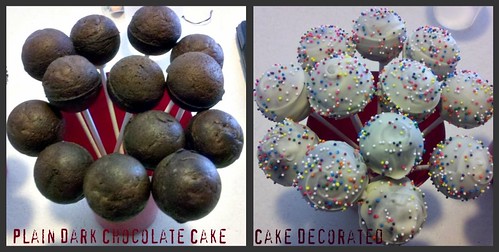
The directions suggest adding 1 tablespoon of batter into each well.  I found with the thickness of the formula above, you don't need that much, if you add just under one tablespoon you should be good to go.  The 1st batch I did started to bake before I had a chance to finish filling all 12 wells, but it was fine. Once you have all your batter in the wells, close and lock your CakePop Maker and in 4 minutes you will have some delicious little bites of cake ready for decorating.

The coating of chocolate is a whole other story I, burned about 1 1/2 lbs of melting chocolate because I didn't follow the directions. Note to self: READ DIRECTIONS.  I tried to melt at full power in the microwave for 1 minute and all that got me was some disgusting looking curdled chocolate. Yuck!!!  So my tip to you. if using the microwave use 50% power for 1 minute then 15 second intervals until chocolate fully melted.  I still found the chocolate to be too thick to dip so I would up swirling the cakepops in which came out okay, but I wanted the smooth look I see picture of on the internet.  They suggest adding a couple teaspoons of Crisco Shortening to help smooth it out, but I didn't have any of that so I had to wing it until I go shopping.

I tell you what these little things can be very addicting, even if you are like me and don't bake.  I will be baking from now on especially with the holidays right around the corner. My co-workers are going to love me :-).

Okay back to why I made them...one of my co-worker's birthday was coming up and I wanted to do something really nice for him because he's had a rough few months with illness and death in his family. He likes to eat and loves to fish (he has brought me the freshest red fish ever) so to return the favor, I made him some cakepops & a fish themed birthday card.

The cakepops were displayed in a box I created in Make-The-Cut Software using the text to path and new node editing tools and the card was created using fonts and some Lettering Delights Cut-It sets.

Birthday Gift


Until next time...

-------------------------------------------------------------------------------------- Cheryl-TeeDee Bakes Sig

Wednesday, November 28, 2012

Girl Onesie Cookies for Baby Shower

Well it's been quite awhile since I wrote something on this blog, but being out of work has had me in a funk.  What better way to get myself out of it is to keep busy and get the creative juices flowing. Plus this gives me a chance to better my decorating skills. So...my niece is having a baby shower on Saturday in New Orleans and since I live in Florida I can't be there.  I wanted to send her something special so I made 40 Baby Onesie Cookies to help her celebrate given the fact that they are pink I'm sure you can guess IT'S A GIRL!!  I started out with my favorite sugar cookie recipe and used a glaze instead of the normal Royal Icing.

Cookies Drying on work table
On my work table drying.

Baby Shower Cookies
Packaged

More to come since Christmas is coming :-)

Cheryl-TeeDee Bakes Sig

Monday, December 19, 2011

Adventures in Baking my 1st Cake

So this is my 1st cake that I decorated and I was a little nervous because I had never decorated a cake before other than buying some icing from the store and slapping it on (tragic I know).  I had found this cake tagged on Pinterest (my favorite place), someone had done a ombre cake and I loved the way it looked so I decided to take a play on that style and create something similar, but not so elaborate for my co-worker who celebrated her birthday over the weekend.

I'm pretty pleased with the way it came out considering it was my 1st.  It is a Triple-Chocolate Cake with Cheesecake center. I made a fresh buttercreme icing and sprayed it with some Wilton Food Color Spray. I was hoping she would cut it at work so I could take a picture of the middle, but alas she wanted to savor it all for herself (which is totally her right, it is her cake after-all).  She has promised to take a picture of the inside for me so I can add it to this post.  So without further ado here is at least the outside of the cake...

1st Time Decorated Birthday Cake


Update 12/20/11
Cake has been cut and it looks quite nice.

Cake Cut

Until Next Time...

Wednesday, December 7, 2011

My New Adventures in Baking!

New KitchenAid MixerSo since I've just hit the milestone birthday (12/5). Turning 50 has got me thinking of things I want to do while I can still enjoy doing them, a bucket list of some sort.  Baking happens to be top on my list so I bought myself a KitchenAid Mixer for my birthday I pimped it out a little using Make the Cut software and some outdoor vinyl .  My mom was a terrific cook and I wasn't sure if I had any of her talent.  Last night I dabbled in a recipe I found for Pecan Praline Cookies, when I told my daughter I was going to try the recipe she looked at me funny and said "Ma, I know we're from New Orleans and all, but REALLY!!???". I just smiled and said, well if it doesn't work out all I've lost is a couple hours and some pantry supplies.

Roll in 9:32PM, I took the last batch out of the oven and I gave her the first cookie from my newest batch of cookies, I thought she was going to fall on the floor.  She squealed "Ma, this is the best cookie I ever tasted", I just smiled and said "good because I am bringing them to work tomorrow to go with our Holiday Luncheon".  Her entire face dropped and with doe eyes she asked if I could make her some too.  I gently reminded her that she thought I was crazy to bake them in the 1st place, but she truly is eating her words now. I didn't tell her, but I made a couple dozen for home too.

Took them to work today (12/7) and OMG! they went nuts over them.  Several people said it was by far the best cookie they had ever eaten.  I just smiled and whispered "Thanks Mom".  The cute little box I made to package them in came from instructions found here:
 http://thecreativeitchboutique.blogspot.com/2010/12/cookie-box.html

Pecan Praline Cookies

Until Next time...

Monday, October 24, 2011

Yet Another Acrylic Birthday Cup

Been awhile since I've posted, don't have much time today, but wanted to at least post something.  I'm going to try to post at least once per week, but with the holidays coming up I don't know if I will be able to keep that commitment, but I will try.

October 29th is my sister's birthday and she is a girly, girly that loves bling so without further ado here is her cup.

Tumbler for sister
Click Image to view larger
Until next time...

Blogger C-Sig

Saturday, September 17, 2011

Get Crafty With It

Zumba Set
So It's been awhile since I posted.  Been kinda busy at work which didn't give me a lot of time to play. But my creative juices are flowing always, when I wake up, when I'm driving, when I have free time.  My youngest sister is a Zumba instructor and her birthday was coming up. Since she has a unique name I know she would never find anything personalized just for her right off the rack so my thought process began.

I captured the Zumba symbol and put it on a shirt and drink cup for her to wear when she is teaching her class. She was really happy with it as a matter of fact she said she LOVED IT!  My work was done.

Happy Birthday Girl!!


Until next time...

Blogger C-Sig

Wednesday, September 7, 2011

Hoppy Bookmarks inspired by Jin

Under A Cherry Tree by Jin Yong has got to be one of my favorite sites when it comes to paper crafting.  Her creativity is well just...AWESOME!!!

I really don't know how she comes up with the things she does. I'd like to borrow her brain just for a day and soak up her thought process when she thinks up these clever ideas and turns them into reality.

Well here is my take on her post for some really cute bookmarks. Because I love reading and would love for everyone in the world to read more I decided to try my hand at creating some myself.  In Jin's version she made them more 3-D, but because I was making them for a class of 1st graders, I didn't want them to pull off pieces with there inquisitive minds and busy fingers so I did mine as a print-n-cut using Make The Cut and my Silhouette SD.  I made 20 of those little rascals and they were a blast to make.

I pretty much followed her directions on making the "U" shape for the slit, it was very easy and the visual help me put it together, but all that gluing UGH!  I had to cut each piece twice and glue together because the card stock I had was a little to flimsy and I wanted a sturdy base for the little froggies to sit on.

I'm mailing them today....can't wait til my sister gets them.

Here are my results:

Bookmarks - Close Up Reading Bookmarks

Thanks Jin for your creativness you are truly an inspiration.

Until next time...

Blogger C-Sig